Falling Asleep? Detect Closed Eyes in Real Time
A drowsiness detector to try out on yourself
- Introduction
- Prerequisites (I prepared this in advance)
- Imports
- Alarm Setup
- Load OpenCV Haar kernels used to detect facial landmarks
- Load the CNN model and start video stream
- Start prediction cycle
- Result
Introduction
For this ML/DL project, we will implement a relatively simple drowsiness-detection tool. Drowsiness detection can be done by measuring if someone’s eyes were closed longer than blinking and may be a life-saver in many instances. For example while driving a vehicle for long hours or at night (Wikipedia: Driver drowsiness detection, NYTimes: Sleepy Behind the Wheel? Some Cars Can Tell). Other use cases are more recent applications such as virtual school classes. In either case, we hope people are wide awake during these activities.
I will show how to implement a camera system that watches a person and can tell if they are falling asleep. The most accute signs for this are prolonged periods of closed eyes.
For the model here I will first use a Haar Cascade object identifier to find face and eyes in real-time footage. From an incoming frame, the eyes will be cropped and fed into a Convolutional Neural Netowk (CNN) model for inference.
If closed eyes were predicted for several consecutive frames, a warning chime will sound. When eyes are predicted open again, everything is supposed to go back to normal.
Give it a go!
Prerequisites (I prepared this in advance)
Dataset creation. To create the DNN dataset, a script was written that captures eyes from a camera and stored them on local disk. They were labeled “Open” or “Closed”. The data was manually cleaned by removing bad and redundant images. The dataset comprised ~7,000 images of people’s eyes under different lighting conditions. Sorry, this is too big for GitHub.
Training. Next, a Deep Neural Network (DNN) model was trained to classify open and closed eyes. See file “Drowsiness_detection_CNN_pre-train.ipynb” and the the final weights and model architecture file “cnnCat2.h5”.
Object Detection. The Haar Cascade (example in OpenCV) finds landmarks in image frames and cuts them out. The Haar Cascade algorithm produces similar results as the newer YOLO object detection using image convolution filters but instead uses kernel computation. Kernel computation is very similar to YOLO’s convolution filters. Different kernels are tuned for different landmarks and can be loaded as needed. The “cascade” part of the algorithm is used to narrow down features to the wanted areas and save computation. The kernels we will use here are set to detect eyes and face. Many pre-tuned kernels are shared by OpenCV for different purposes and objects. Link to OpenCV’s kernel repo.
If you want to follow along and try it out yourself, download the Jupyter notebook. Check if your environment has all the packages installed. The necessary data files for this project are available from this folder. Make sure the paths in the notebook point to the correrct local directories. And of course, you will need a video camera or webcam plugged into your computer.
Imports
Call all the libraries we need for this project
import cv2
import os
from keras.models import load_model
import numpy as np
from pygame import mixer
Alarm Setup
Load the wav file you want to play on detection.
mixer.init()
sound = mixer.Sound(f'{os.getcwd()}\\Data\\drowsiness_data\\Electronic_Chime-KevanGC-495939803.wav')

sound.play()
Load OpenCV Haar kernels used to detect facial landmarks
The “haar cascade” xml files are needed to detect objects from the image. In this case, the kernels are tuned to detect the face and eyes of the person.
face = cv2.CascadeClassifier(f'{os.getcwd()}\\Data\\drowsiness_data\\haarcascade_frontalface_alt.xml')
leye = cv2.CascadeClassifier(f'{os.getcwd()}\\Data\\drowsiness_data\\haarcascade_lefteye_2splits.xml')
reye = cv2.CascadeClassifier(f'{os.getcwd()}\\Data\\drowsiness_data\\haarcascade_righteye_2splits.xml')
Load the CNN model and start video stream
The inference happens in an infinite while-loop that grabs a frame from the webcam feed, identifies the face and eyes, runs a classifier on the eyes, and then calculates a “drowsiness-score”.
We can select a score threshold when a sound will be triggered.
Effectively, the score will increase with closed eyes and is a measure for how long the eyes were closed.
The threshold that has to be reached before sounding the alarm prevents the model from predicting simple blinking as drowsiness. Futhermore, both eyes need to be closed at the same time.
model = load_model(f'{os.getcwd()}\\Data\\drowsiness_data\\cnncat2.h5')
path = os.getcwd()

# Capture accesses the video feed. The "0" is the number of your video device, in case you have multiple.
cap = cv2.VideoCapture(0)
if cap.isOpened() == True:
    print("Video stream open.")
else:
    print("Problem opening video stream.")

font = cv2.FONT_HERSHEY_COMPLEX_SMALL

# starting value for closed-eyes inferences
score = 0
threshold = 6
thicc = 2
rpred = [99]
lpred = [99]
Start prediction cycle
When executing the next cell, a window with the video capture will pop up.
Quit by hitting ‘q’. To re-start, open the video capture again (execute cell above).
# Infinite loop of capturing, infering, and scoring
while(True):
ret, frame = cap.read()
height,width = frame.shape[:2]
# convert frame to grayscale
gray = cv2.cvtColor(frame, cv2.COLOR_BGR2GRAY)
# Apply Haar Cascade object detection in OpenCV to gray frame
faces = face.detectMultiScale(gray,minNeighbors=5,scaleFactor=1.1,minSize=(25,25))
left_eye = leye.detectMultiScale(gray)
right_eye = reye.detectMultiScale(gray)
# draw black bars top and bottom
cv2.rectangle(frame, (0,height-50) , (width,height) , (0,0,0) , thickness=cv2.FILLED )
# draw face box
for (x,y,w,h) in faces:
cv2.rectangle(frame, (x,y) , (x+w,y+h) , (100,100,100) , 1 )
# take detected RIGHT eye, preprocess and make CNN prediction
for (x,y,w,h) in right_eye:
r_eye = frame[y:y+h,x:x+w]
r_eye = cv2.cvtColor(r_eye,cv2.COLOR_BGR2GRAY)
r_eye = cv2.resize(r_eye,(24,24))
r_eye = r_eye/255
r_eye = r_eye.reshape(24,24,-1)
r_eye = np.expand_dims(r_eye,axis=0)
rpred = model.predict_classes(r_eye)
break
# take detected LEFT eye, preprocess and make CNN prediction
for (x,y,w,h) in left_eye:
l_eye = frame[y:y+h,x:x+w]
l_eye = cv2.cvtColor(l_eye,cv2.COLOR_BGR2GRAY)
l_eye = cv2.resize(l_eye,(24,24))
l_eye = l_eye/255
l_eye =l_eye.reshape(24,24,-1)
l_eye = np.expand_dims(l_eye,axis=0)
lpred = model.predict_classes(l_eye)
break
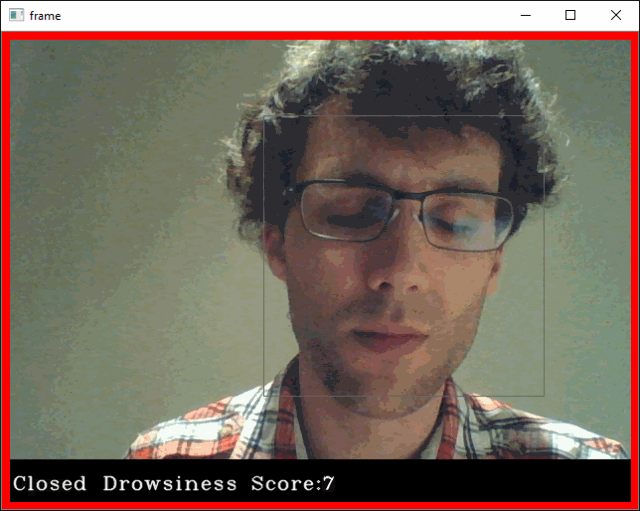
# labeling for frame, if BOTH eyes close, print CLOSED and adding/subtracting from score tally
if(rpred[0]==0 and lpred[0]==0):
score += 1
cv2.putText(frame,"Closed",(10,height-20), font, 1,(255,255,255),1,cv2.LINE_AA)
# prevent a runaway score beyond threshold
if score > threshold + 1:
score = threshold
else:
score -= 1
cv2.putText(frame,"Open",(10,height-20), font, 1,(255,255,255),1,cv2.LINE_AA)
# SCORE HANDLING
# print current score to screen
if(score < 0):
score = 0
cv2.putText(frame,'Drowsiness Score:'+str(score),(100,height-20), font, 1,(255,255,255),1,cv2.LINE_AA)
# threshold exceedance
if(score>threshold):
# save a frame when threshold exceeded and play sound
cv2.imwrite(os.path.join(path,'closed_eyes_screencap.jpg'),frame)
try:
sound.play()
except: # isplaying = False
pass
# add red box as warning signal and make box thicker
if(thicc<16):
thicc += 2
# make box thinner again, to give it a pulsating appearance
else:
thicc -= 2
if(thicc<2):
thicc=2
cv2.rectangle(frame, (0,0), (width,height), (0,0,255), thickness=thicc)
# draw frame with all the stuff with have added
cv2.imshow('frame',frame)
# break the infinite loop when pressing q
if cv2.waitKey(1) & 0xFF == ord('q'):
break
# close stream capture and close window
cap.release()
cv2.destroyAllWindows()
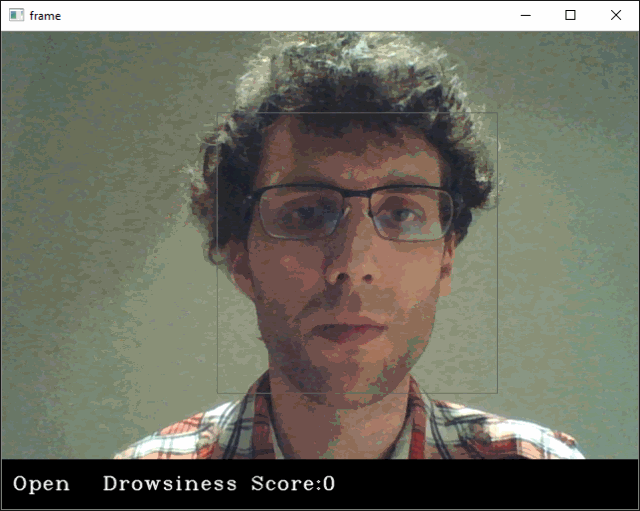
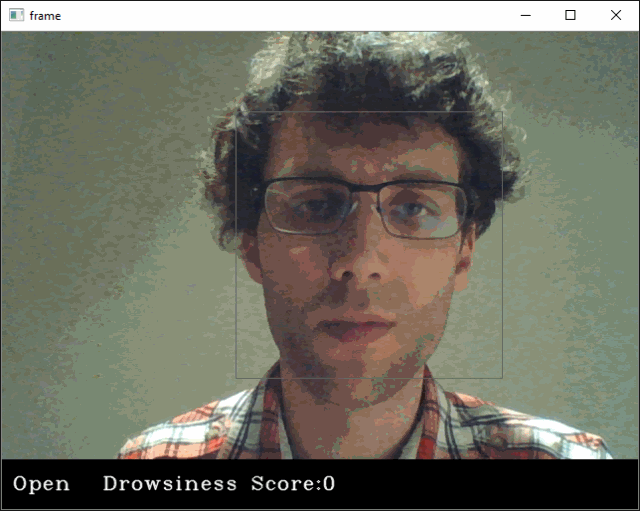
Result
- Normal

- Blinking
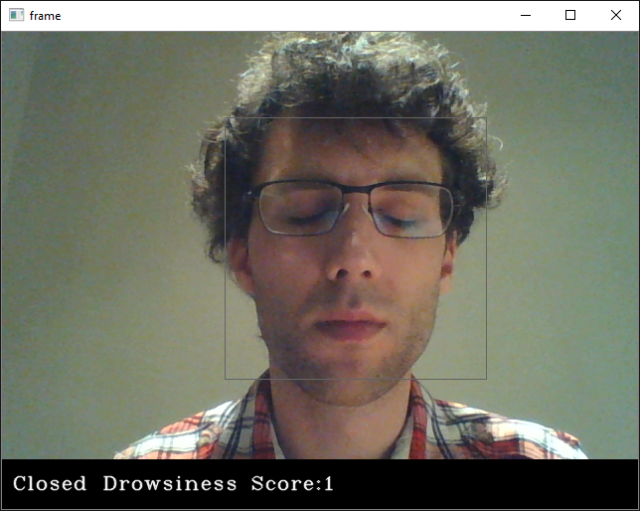
- Eyes closed for too long
- Videos